Thinking about upgrading to a smart thermostat? If you're tired of fluctuating temperatures, high energy bills, or simply want more control over your home's climate, a Nest Thermostat is a game-changer. This comprehensive Nest Thermostat Installation Guide will walk you through everything you need to know, from checking compatibility to configuring its smart features, making the setup process smooth and stress-free. With Nest, you're not just installing a device; you're setting the stage for significant energy savings and unparalleled comfort.
Heating and cooling often devour nearly half of your household's utility bill. A Nest Thermostat can typically trim 10-15% off those costs, which translates to $150-$225 saved annually for a home spending $1,500 on energy. It’s an investment that pays for itself.
At a Glance: Your Nest Installation Journey
- Compatibility First: Always check if your HVAC system works with Nest. Most standard 24-volt systems are good to go.
- C-Wire Clarity: Understand the C-wire's role for continuous power and what to do if you don't have one (Power Connector or professional help).
- Simple Swap: The physical installation is generally straightforward, requiring basic tools.
- App & Wi-Fi: The Nest pairs with the Google Home app and your home Wi-Fi for remote control and smart features.
- Personalized Comfort: Configure settings like Eco Temperatures and Home/Away Assist to tailor your energy savings.
- Save Big: Expect to see 10-15% savings on your heating and cooling bills annually.
Why Nest? The Smart Savings & Comfort Story
Before we dive into the nuts and bolts of installation, let's briefly touch on why a Nest Thermostat makes such a difference. Beyond just looking sleek on your wall, these devices are packed with advanced sensors, connectivity, and machine learning capabilities. They don't just set a temperature; they learn your preferences, optimize energy use, and adapt to your schedule, all while giving you granular control right from your smartphone.
Imagine a thermostat that knows when you're away and automatically adjusts to save energy, then warms or cools your home just before you arrive. That's the power of Nest, turning your climate control from a chore into an intelligent, invisible partner in comfort and savings. Whether you're considering the latest models or have a Nest 3rd Generation Thermostat waiting to be installed, the core benefits remain the same: smart, responsive, and efficient home climate management.
Before You Begin: The Crucial Pre-Checks
A successful Nest installation starts long before you pick up a screwdriver. These preliminary steps ensure compatibility, gather necessary information, and most importantly, keep you safe.
Is Your Home Ready? (Compatibility Check)
Not all HVAC systems are created equal, and while Nest Thermostats are designed to be widely compatible, confirming yours is a crucial first step.
- Standard Systems: Most standard 24-volt heating and cooling systems, common in residential homes, work perfectly with Nest. This includes forced air, radiant, heat pump (with auxiliary heat), and dual-fuel systems.
- High-Voltage & Proprietary Systems: Nest is not compatible with high-voltage systems (like electric baseboard heaters, radiant floor heating with 120V or 240V, or some mini-split ductless systems) or proprietary systems that use unique communication protocols. These systems typically don't have the standard 24-volt wiring.
- Complex Setups: If you have a multi-stage system (e.g., a two-stage furnace and a two-stage AC) or a zoned system, Nest can often handle it, but it might require a more nuanced wiring configuration. When in doubt, Google offers an excellent online compatibility checker. Just input your current thermostat's wiring, and it will tell you if Nest is a fit. If it's borderline, consider professional verification to avoid issues.
The C-Wire Conundrum: Understanding Constant Power
The "C-wire" (common wire) is often the subject of much discussion among smart thermostat users. Here's why it matters:
- What it does: The C-wire provides continuous, low-voltage power to your thermostat. Smart thermostats, with their Wi-Fi radios, displays, and sensors, need more consistent power than traditional mercury or battery-powered thermostats.
- "Power Sharing": Nest Thermostats are designed to be smart about power. If a dedicated C-wire is absent, they can often function using "Power Sharing," which siphons tiny amounts of power from the heating/cooling wires when the system isn't actively running. This usually works fine, but it can lead to intermittent issues like Wi-Fi dropouts, screen dimming, or system short-cycling (where your HVAC turns on and off too frequently) in some setups.
- Improved Reliability: For optimal performance and reliability, especially with multi-stage systems or those with longer wire runs, a dedicated C-wire is always recommended.
- Adding a C-wire:
- Nest Power Connector: This small device, sold separately, is a homeowner-friendly solution that allows you to add a "virtual" C-wire connection at your furnace or air handler, routing power to the thermostat without needing to run a new wire through your walls. It's often the easiest DIY fix.
- Professional Installation: If the Nest Power Connector isn't suitable, or if you prefer not to tackle wiring inside your HVAC system, an HVAC technician can professionally install a physical C-wire. This ensures robust power delivery and peace of mind.
Before you proceed, check your existing thermostat's wiring. If you see a wire labeled "C," you're likely good to go. If not, don't worry – Nest has options.
Gather Your Tools
You won't need a full toolbox for this job, but having a few essentials on hand will make the process smoother:
- Screwdriver: A Phillips head screwdriver is usually sufficient. Some thermostats might require a flathead.
- Your Smartphone or Tablet: You'll need this for the Google Home app setup.
- A Camera (your phone is perfect): Crucial for photographing your old thermostat's wiring.
- Labels (included with Nest, or painter's tape): To mark your wires.
- Pencil/Pen: For marking wall if needed.
- Drill (optional): Only if you need to drill new pilot holes for the Nest baseplate.
Safety First! Turn Off the Power
This step is non-negotiable. Working with electrical wiring, even low-voltage, can be dangerous and damage your HVAC system.
- Locate your circuit breaker: Find the breaker that controls your furnace, air handler, or boiler.
- Flip the switch: Turn off the power. Don't just rely on turning the thermostat to "off"; you need to cut the main power supply to your HVAC system.
- Verify: You can confirm the power is off by trying to turn on your old thermostat (it shouldn't light up or operate).
Step-by-Step: Your Nest Thermostat Installation Journey
With the pre-checks done and safety ensured, you're ready for the physical installation. Take your time, follow these steps carefully, and remember that patience is your best tool.
Farewell, Old Friend: Removing Your Existing Thermostat
The goal here is to carefully document and disconnect your old thermostat.
- Remove the Cover: Gently pull the cover off your existing thermostat. It might snap off, unclip, or require unscrewing a couple of small screws.
- Take a Photo: This is arguably the most important step. Snap a clear, well-lit photo of your current wiring configuration. This photo is your blueprint if you get confused later. Make sure you can clearly see which wire is connected to which terminal label (e.g., "R," "G," "Y," "W," "C").
- Label the Wires: Use the labels provided with your Nest Thermostat (or painter's tape and a pen). Match each label to the corresponding wire terminal. For example, if a red wire is connected to the "R" terminal, put the "R" label on that red wire. Do this for every single wire connected.
- Important Note: If you see any wires that are not connected to a terminal (sometimes tucked away), don't worry about labeling them for now. They may be spares.
- Disconnect the Wires: Once all wires are labeled, use your screwdriver to gently loosen the terminal screws and pull each wire free.
- Remove the Base Plate: Unscrew the old thermostat's base plate from the wall. You might find a hole in the wall with wires poking through – this is normal.
Mounting the Nest Base: Precision Matters
Now, it's time to put the Nest base in place.
- Feed the Wires: Carefully pull the labeled wires through the center opening of the Nest base plate.
- Position the Base: Hold the Nest base against the wall. Use the built-in bubble level (if your Nest model has one) or a separate level to ensure it's straight.
- Mark and Drill (if needed): If the old screw holes don't align, use a pencil to mark new pilot holes. Then, use a small drill bit (usually 3/32" or 2.5mm, check your Nest manual) to drill these pilot holes. Insert the provided wall anchors if you're drilling into drywall.
- Secure the Base: Screw the Nest base plate firmly to the wall. Don't overtighten.
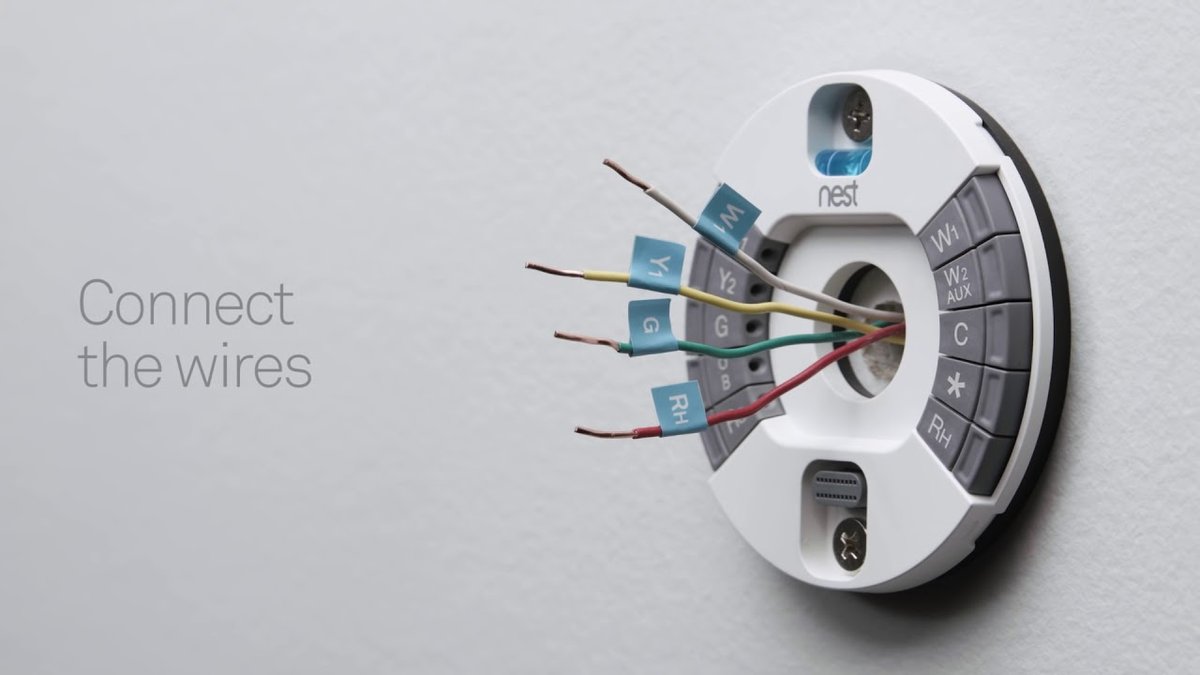
- Connect the Wires: This is where your photo and labels come in handy. Gently push each labeled wire into its corresponding terminal on the Nest base. Nest terminals are usually push-in connectors; just push the button, insert the wire, and release. Give each wire a gentle tug to ensure it's securely seated.
- Double-check: Compare your Nest wiring to your original photo one last time. Ensure no stray strands of wire are touching other terminals, which could cause a short.
Attaching the Nest Display: The Moment of Truth
This is the satisfying click that brings your Nest to life.
- Align the Display: Carefully align the Nest display with the base plate. There's usually a clear orientation; typically, the Nest logo should be at the top.
- Press Firmly: Gently push the display onto the base until you hear a satisfying click. It should sit flush against the wall.
Power On!
Head back to your circuit breaker and flip the power switch back on. Your Nest Thermostat display should light up, signaling it's receiving power. If it doesn't light up immediately, wait a moment. If nothing happens, go back and double-check your wiring and power supply.
The Software Setup: Bringing Your Nest to Life
With the hardware installed and powered up, the smart part begins. The Nest Thermostat guides you through an intuitive on-screen setup process, followed by integration with your Google Home app.
Initial On-Screen Prompts
Once powered, your Nest display will walk you through a few basic steps:
- Language Selection: Choose your preferred language.
- Wi-Fi Connection: Connect your Nest to your home Wi-Fi network. You'll likely need to select your network name and enter your Wi-Fi password. A stable Wi-Fi connection is essential for all of Nest's smart features, remote control, and firmware updates.
- Location: Nest will ask for your location to provide accurate weather data and to understand local energy-saving opportunities.
Connecting to the Google Home App
For most Nest devices, the Google Home app is your primary hub for control and advanced features.
- Download the App: If you don't already have it, download the Google Home app on your smartphone or tablet from your device's app store.
- Sign In: Sign in with your Google account.
- Add Device: In the Google Home app, tap the "+" icon to "Set up device," then select "New device." The app will guide you through scanning a QR code on your Nest display or manually entering a pairing code.
- Assign to a Home: You'll assign your Nest to a specific "Home" in the app (e.g., "My House"). This helps organize your smart devices.
Once paired, you'll have full remote control of your thermostat from anywhere, as long as both your phone and Nest have internet access. This capability is key to Nest's convenience and energy-saving potential.
Personalizing Your Comfort
The Nest will now ask you a few questions to begin building its understanding of your home and preferences:
- Home Information: You'll confirm your location, the type of HVAC system you have (e.g., furnace, heat pump), and your preferred comfort ranges.
- Initial Schedule: Nest might ask you about your general schedule (when you're home, when you're away) to create an initial baseline. Don't worry, this isn't set in stone; the learning features will refine it.
Activating Smart Features
This is where you unlock Nest's energy-saving magic:
- Eco Temperatures: Enable this feature, and Nest will automatically switch to energy-saving temperatures when it detects you're away or asleep. You can customize these "Eco" ranges.
- Home/Away Assist: This powerful feature uses sensors in the Nest itself and/or your phone's location (if you grant permission) to detect whether anyone is home. When everyone leaves, it automatically switches to Eco Temperatures. When someone returns, it adjusts back to your comfort settings.
- Optional Temperature Sensors: If you have hot or cold spots in specific rooms, you can add Nest Temperature Sensors (sold separately). These allow your Nest Thermostat to prioritize comfort in a particular room during certain times of the day, ensuring the temperature where you are is just right. This is particularly useful for bedrooms or home offices.
Beyond Installation: Mastering Your Nest Thermostat
Installation is just the beginning. The real power of your Nest Thermostat unfolds as it learns and you engage with its advanced features.
The Learning Curve: How Nest Adapts to You
The Nest Learning Thermostat (and its newer iterations with similar functionalities) isn't just programmable; it's adaptive. Over the first few weeks, it observes your temperature adjustments. If you consistently turn down the heat before bed or crank up the AC after work, Nest notices. It then uses this information to build a custom, automated schedule that reflects your habits, potentially eliminating the need for you to manually adjust it ever again. This hands-off approach to energy saving is one of its most celebrated features.
Remote Control & Energy Insights
The Google Home app becomes your command center. From your couch, your office, or even across the country, you can:
- Adjust Temperature: Change settings with a tap.
- View Energy History: Dive into daily and monthly energy reports. These insights show you how much energy you're using, when your system is active, and how your settings impact consumption. This data empowers you to make smarter choices.
- Receive Alerts: Get notifications if your home gets too hot or cold, or if there's a potential issue with your HVAC system.
Proactive HVAC Monitoring
Nest isn't just about controlling temperature; it's also a vigilant guardian of your heating and cooling system. It monitors system health, looking for unusual patterns. If, for example, your furnace starts taking significantly longer to heat your home than usual, Nest can alert you to a potential issue. This proactive monitoring can help you catch minor problems before they escalate into costly repairs, saving you money and discomfort down the line.
Integrating with Your Smart Home
The Nest Thermostat plays well with others. It seamlessly integrates with the broader Google Home ecosystem, allowing for voice control via Google Assistant devices (like Google Nest Hubs or smart speakers). "Hey Google, set the thermostat to 72 degrees!" is a common command. Furthermore, it often integrates with many third-party smart home platforms, making it a central component of a connected home.
Tapping into Utility Programs
Many energy providers partner with Google Nest to offer programs that can further boost your savings:
- Rush Hour Rewards: During periods of peak energy demand (e.g., hot summer afternoons), your utility might ask Nest to subtly adjust your thermostat a few degrees. In return, you can earn credits or rebates on your bill. Nest always prioritizes your comfort, allowing you to override these adjustments if needed.
- Seasonal Savings: This feature gently fine-tunes your schedule over several weeks, making tiny, almost imperceptible adjustments that add up to significant energy trimming without impacting your comfort.
Your Nest automatically receives over-the-air firmware updates, ensuring you always have the latest features, improved reliability, and enhanced energy-saving algorithms without lifting a finger.
Troubleshooting Common Installation Hiccups
Even with the best instructions, sometimes things don't go exactly as planned. Here are a few common issues and quick fixes:
- "No Power" or "E74" Error on Display:
- Check the Breaker: Did you turn the power back on?
- Wiring: Re-check all connections at the Nest base. Ensure wires are fully seated and no stray strands are touching other terminals.
- C-wire: This often points to insufficient power. If you don't have a C-wire, consider installing a Nest Power Connector.
- Wi-Fi Connectivity Issues:
- Password: Double-check your Wi-Fi password.
- Router Distance: Is your Nest too far from your Wi-Fi router?
- Restart: Try restarting your router and then your Nest (you can usually find a restart option in the settings menu or by temporarily removing the display from its base).
- Temperature Accuracy Concerns:
- Location: Is your Nest in direct sunlight, near a vent, or behind a curtain? These can affect its readings.
- Drafts: Seal any drafts around the thermostat's mounting hole.
- Calibration: Nest usually self-calibrates, but if you suspect a major discrepancy, contact Nest support.
For more detailed troubleshooting, the Nest support website is an invaluable resource, offering specific guides and diagnostic tools.
The Future of Smart Climate Control: What's Next for Nest?
Your Nest Thermostat isn't a static device; it's part of an evolving smart home ecosystem. While current models receive ongoing software updates that add features and improve efficiency, the future holds even more promise. Expect tighter integration with renewable energy systems, allowing Nest to intelligently manage your home's energy consumption based on grid conditions or solar panel output. Smarter AI-powered automation will likely make the thermostat even more intuitive, anticipating your needs before you even think of them. Expanded utility partnerships will also likely offer more innovative programs to save you money and contribute to a more sustainable grid. Even as technology advances, the core mission of Nest remains: making your home more comfortable, efficient, and intelligent.
Your Smart Home Journey Starts Now
Installing a Nest Thermostat is a significant step towards a smarter, more energy-efficient home. While it might seem like a complex task at first glance, breaking it down into manageable steps – from crucial compatibility checks to the final software setup – makes it a rewarding DIY project for most homeowners. You've now gained the knowledge to confidently install your Nest, unlock its powerful features, and begin enjoying the benefits of intelligent climate control. Say goodbye to guesswork and hello to personalized comfort and tangible savings.